Google Chromecast is the most versatile streaming device that fulfils the streaming needs for its users. Google Chromecast lets you cast media from your PC to TV. Chromecast enables you to access media from various video streaming services including YouTube, Netflix etc. Downloading the latest version of Google Home app on your mobile and a Chrome Browser on PC enables you to mirror your device screen to your TV. In this article, we will provide you with simple and easy steps to setup Chromecast on Windows PC and laptop devices.
There are different versions of Chromecast available such as Chromecast 1st, 2nd and 3rd generations. The highly powerful Chromecast Ultra enables you to stream in 4K Ultra HD resolution and it also supports high dynamic range through the HDR 10 and Dolby Vision formats. With this Chromecast Setup, you can make your ordinary TV into a Smart TV. Using Chromecast on TV lets you enjoy unlimited entertainment. You can watch all your favourite contents on a bigger screen. You can use your Windows 10 PC or Phone as your remote and stream media to your TV without any limitations.
You may also like: How to Install Kodi on Xbox One & Xbox 360?
Requirements to Setup Chromecast for Windows PC/Laptops
While there are different ways to cast your computer screen to your TV, the most simple and convenient way is to use Google Chromecast to cast your computer screen to your TV. The following are the requirements to setup Chromecast for pc.
- Google Chromecast device.
- PC or laptop that runs on any of the latest version of Windows such as Windows 7, Windows 8, Windows 8.1, and Windows 10 operating systems.
- Secure Wireless Network (Wi-Fi)
- The latest version of Google Chrome Browser installed on your computer.
Related: What is Google Chromecast? Everything You Need to Know
How to Setup Chromecast on Windows?
Once you have met all the requirements that are given above, then you can proceed with the setup procedure.
1. Connect Chromecast to TV
If you are using a regular Chromecast, connect it to the HDMI port of your TV and connect its power cord to the USB port on your TV or you can use the nearby charging power outlet. In case if you are using the Chromecast Ultra, then connect it to your TV’s HDMI port, and connect the charging cord to the power outlet, since it won’t work on any USB cable or port.
2. Download & Install Chrome Browser
Visit google.com/chrome to download and Install the Google Chrome Browser on your PC. If you already own a Chrome browser then update it.
3. Visit
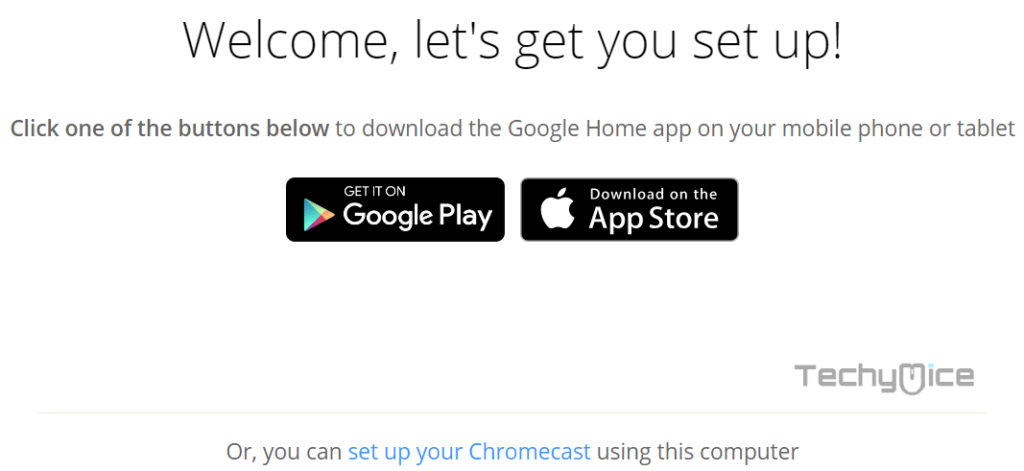
Open your chrome browser and go to Chromecast Setup webpage.
4. Set up Your Chromecast
Click on Set up your Chromecast using this computer link at the centre of the page.
5. Searching for Cast Devices
Now the webpage will begin searching for the available Chromecast devices, that is connected to your Wi-Fi network.

Note: If it does not Find your Chromecast device, try switching the WiFi Network on your PC from 2.4 to 5 GHz or vice versa.
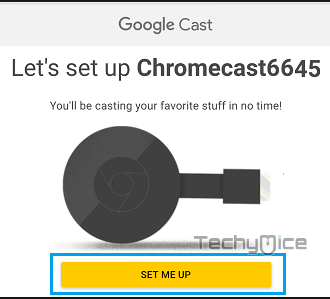
6. Initiating the Setup
Once the device has been found by the webpage, just click on it and click the “Set Me Up” button to initiate the setup.
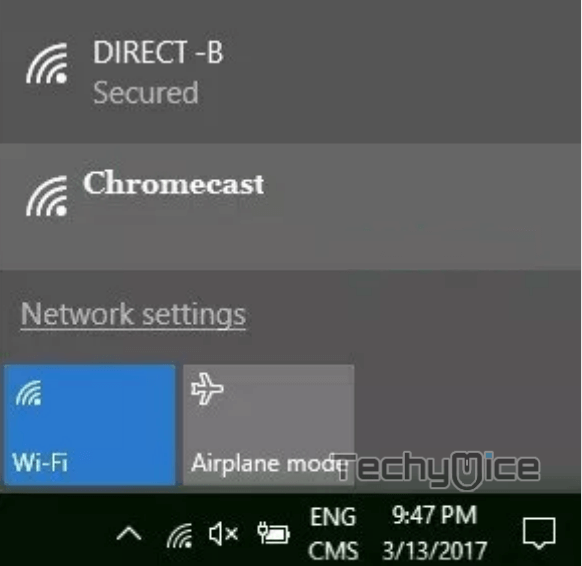
7. Connecting Chromecast to Wi-Fi
Connect your Chromecast to the Wi-Fi network, once after connecting to a network, click on Next.
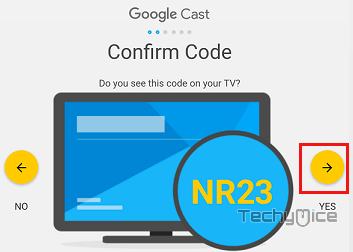
8. Matching up the Chromecast Code
Now you can see a code on your screen if the code appeared on your Windows and your TV then click on “Yes” else click “No” and repeat the steps again until you find the matching code.
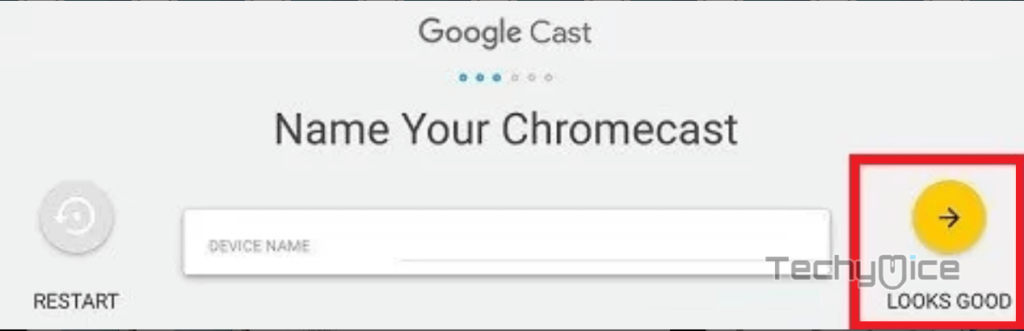
9. Naming the Chromecast
Once the code gets matched, then you will be asked to give a Name for your Chromecast. Type in the Name that you wish to give and click on “Looks Good“.
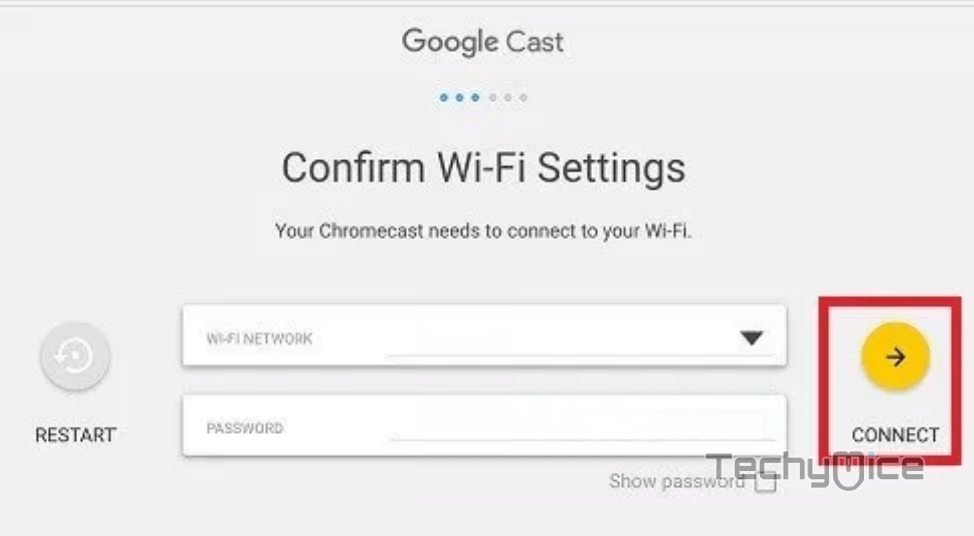
10. Providing Wi-Fi Network Credentials
Then just provide your Wi-Fi Network details and enter your password for your Wi-Fi Network and click on “Connect“.
11. Ready to Cast
Now you can see the “Ready to Cast!” screen. Once you see the Ready to Cast screen, then you are all setup and ready to cast anything that is playing on the screen of your Windows PC onto the bigger screen of your Television.
How to Cast Videos & Movies from Windows PC to TV?
After setting up the Chromecast, then you can easily cast any of your media files such as pictures, audios, and videos from your PC to the large screen TV.
Step 1: Open the Google Chrome Browser on your Windows PC or Laptop
Step 2: Play any Video or Movie on YouTube, Netflix or other Chrome Compatible websites, that you want to watch on the larger screen or your television.
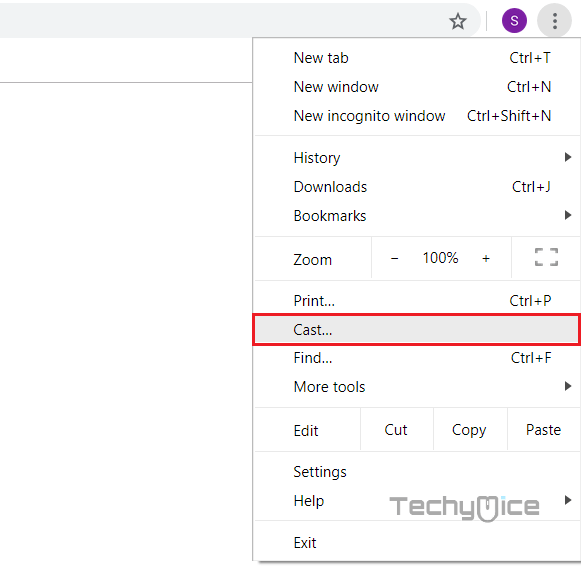
Step 3: Once you have selected the video, then click on the menu (three dots) on the top right corner of your chrome browser and click on “Cast“. You can also click on “Cast Icon” directly if it appears on your browser.
Step 4: Now the content on your PC will be displayed on your TV Screen. If you want to stop casting, then click on the ‘Cast Icon‘ again on the address bar to stop the casting.

Wrapping Up
Setting up Chromecast on your Windows PC is very simple with the above-given method. This simple gadget makes your TV into a smarter one and enables you to cast whatever you want to watch on your big screen TV. Just cast your favourite media through Chromecast and enjoy your day.
Hope you have managed to setup Chromecast on your Windows PC. If you have any questions or suggestions, Please leave that in the comment box below.
![How to Install Fights On Demand (FOD) Kodi Addon? [2024]](https://www.techymice.com/wp-content/uploads/2022/03/How-to-Install-Fights-On-Demand-Kodi-Addon-1-60x57.jpg "How to Install Fights On Demand (FOD) Kodi Addon? [2024]")